

Monday, 11 April 2011
Another Bag
I made this bag this morning out of some more of the Cath Kidston fabric given to me by my Son. It is lined with the same pink sheeting as the other bag.

Bag for Myself
My son bought me some lovely Cath Kidston fabric for my birthday as I said I wanted to make myself a new bag. He bought me a metre of two different fabrics, one pink with white stars and one green with roses.
I had a look at some videos on line to watch how other people were making them and decided to make up my own pattern as I went along.
I cut the pattern out of paper first so that if it worked ok I would still have the pattern.
I had an old bag that I was going to through away that had lining inside with zipped pockets so I took that apart to use as a pattern for the lining. I also reused the zips that were on the bag.
I bought some pink cotton webbing to use as the shoulder strap. I also had some stuff that I bought in Dunelm Mill ages ago that looked like fluffy wadding on one side and cream cotton lining on the reverse. I used this in the outer part of the bag to make it stiffer.
The bag was quite easy to assemble although I did have a bit of trouble in parts. I made up the front pockets first, they have a gusset around the edge to make them stick out. I had to find out where to put the magnet fastenings on the pockets so that the flap would close. After these were made up and lined I sewed them to the front side of the bag.
Then I made the back side of the bag with the zipped pocket inside. Next I made up the lining as it was done on my old bag. I used some pink cotton sheeting for the lining. Then I sewed the gusset to the outer bag.
It was now looking more like a bag. I made up the flap next with the other side of the magnets in it and attached it to the back of the bag. Then I sewed on the shoulder strap and inserted the lining and stitched it down all the way round.
Looking back on it now I think it was hard to attach the lining at the end like this. I think I should have done it with the lining open at the bottom somehow and then turned the bag inside out and sewed around the top for a better finish. I am also thinking that the flap could have been a tiny bit longer.
Here are some pictures of the finished article.


Tuesday, 5 April 2011
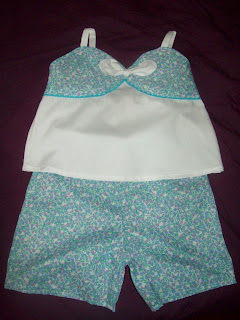
Second Shorts and Top Set
This is the second shorts and top set I made for Kayleigh. I used some blue fabric I had left over from my OH's shirt and made the top out of some white poly cotton I already had adding the "bra" bit of the top in the blue to match the shorts.

Monday, 4 April 2011
Shorts and Top Set
This is the shorts and top set I made for Kayleigh, the fabric for the shorts was given to me by my Sister In Law and I knew straight away it would make a nice pair of shorts as I had just bought the pattern. The fabric for the top was left over from when I made the dolls for Christmas and went just right with the patterned shorts.


Sunday, 3 April 2011
Monkey, by Kayleigh age 6
This is a picture my Granddaughter Kayeligh has been sewing since the beginning of January. She got it for Christmas and has been doing a little bit every time she has come to see me and just finished it today in time to give it to her mum for mother's day. It is her first ever attempt at sewing and I am very proud of her.


Saturday, 2 April 2011
Clothes for Granddaughter - Top and Skirt Set
I had some fabric left over from my butterfly top so decided to make my granddaughter a skirt out of it for her birthday. I had already measured her all over and drew a little diagram in my notebook with all the measurements on like waist, chest, height, length from waist to knee etc. For the skirt I worked out that I wanted the finished article to be about 30 cm in length. I wanted the skirt to be in three layers so it gets more flared as it goes down and each layer would be the same length so this meant each layer would be 10 cm finished. Add on 1 cm each side for seam/bottom hem and an extra 4 cm to the top strip so I can insert some elastic.
This meant that the first strips I cut were 15 cm wide and I cut two of them together and they were 40 cm long. Next I cut the next layer which was 12 cm wide and I cut two pieces this time double the length of the first layer so 80 cm long. Then I cut the bottom layer which was also 12 cm wide and I cut two strips each the width of the fabric which was I think about 137 cm. Next I sewed the two side seams together for each of the pairs of strips. Then I sewed a row of gathering stitches around the top of the bottom layer and gathered it in until it would fit inside the middle layer, pinned with quite a lot of pins to keep it together and then sewed (right sides together). The did the same with the middle layer, gathering it in to fit the top layer and pinning and stitching them together. Then all I had to do was turn up a small hem at the bottom which I stitched up with a zigzag stitch, and then turned over the top making a casing for the elastic about 2 cm turned over. I measured this first before stitching to make sure it would be the right length and think I had to cut off about 1cm all the way round before actually sewing the casing down, leaving a small gap to thread the elastic through.
Here is the finished article.
 I have made a top to go with the skirt using a pattern I bought.

This meant that the first strips I cut were 15 cm wide and I cut two of them together and they were 40 cm long. Next I cut the next layer which was 12 cm wide and I cut two pieces this time double the length of the first layer so 80 cm long. Then I cut the bottom layer which was also 12 cm wide and I cut two strips each the width of the fabric which was I think about 137 cm. Next I sewed the two side seams together for each of the pairs of strips. Then I sewed a row of gathering stitches around the top of the bottom layer and gathered it in until it would fit inside the middle layer, pinned with quite a lot of pins to keep it together and then sewed (right sides together). The did the same with the middle layer, gathering it in to fit the top layer and pinning and stitching them together. Then all I had to do was turn up a small hem at the bottom which I stitched up with a zigzag stitch, and then turned over the top making a casing for the elastic about 2 cm turned over. I measured this first before stitching to make sure it would be the right length and think I had to cut off about 1cm all the way round before actually sewing the casing down, leaving a small gap to thread the elastic through.
Here is the finished article.


Wednesday, 30 March 2011
Second Denim Quilt
Here is the second denim quilt. I am afraid I finished it before I saw someone wanted a tutorial so can't really do a step by step for this one.


I am just about to start a new denim quilt, completely different to this one, I am going to be making it up as I go along so will do some photos as I go and see how it turns out.
I kept looking back at this quilt thinking it looked a bit drab in colours for my youngest niece so decided to brighten it up a bit by adding some fabric yo yos. These are circles of fabric that you cut out and then turn over a small hem all the way round and do a running stitch around to keep it down, the you draw up the thread and fasten it so that its all gathered in the middle. Then you flatten it out to make it look nice and I added a button to the centre before sewing them onto the quilt.
 This is a close up of one of the yoyos attached to the quilt, the next photo is of the whole quilt. It still looks a bit dark but I think its more girly and looks better in real life than in the photo.


I am just about to start a new denim quilt, completely different to this one, I am going to be making it up as I go along so will do some photos as I go and see how it turns out.
I kept looking back at this quilt thinking it looked a bit drab in colours for my youngest niece so decided to brighten it up a bit by adding some fabric yo yos. These are circles of fabric that you cut out and then turn over a small hem all the way round and do a running stitch around to keep it down, the you draw up the thread and fasten it so that its all gathered in the middle. Then you flatten it out to make it look nice and I added a button to the centre before sewing them onto the quilt.


Subscribe to:
Posts (Atom)